
The Perfect Blank Checklist

Tying a new blank can be a very exciting part of the reed making process. With a fresh start, your soon-to-be reed is full of potential!
In my freshman year reed class, our first semester final was to present our professor with three perfect blanks that met all of the criteria on her checklist. We were rewarded with a passing grade in the class, a solid foundation for the rest of our reed making skills, and a tiny piece of chocolate!
You may be eager to learn how to finish your blanks into the perfectly functioning reeds, but your blank tying technique actually has a bigger impact on your final outcome than your scraping does. If your blanks meets certain criteria, they can be finished into beautiful reeds. On the other hand, if your blanks exhibit certain problems by the time you’ve finished tying, no amount of fixing and scraping will ever improve them into comfortable and well-functioning reeds.
While I’m much faster at tying blanks now than I was as a freshman, I still use my professor’s checklist to this day as I’m tying new blanks. If I clip open a blank and it doesn’t meet all of these requirements, I know that it will never improve into a reed that I would enjoy playing. Continuing to try to work on these blanks is a waste of my time.
In this post, I’ll share the checklist that I follow while tying blanks and then explain each bullet point in more depth. This will not be a step-by-step guide for tying blanks, but that guide will be coming soon!
The Checklist
Different reed makers have different opinions regarding what stages of reed making are still considered the “blank” stage. There are also different opinions on when to stop working on a reed and let it dry out after first tying it on. I like to scrape my blank, clip it open, and scrape a little more until it makes a peep before I let it rest.
By the time I leave my blanks to dry, they meet the following criteria:
Seals to the top
Correct overlap, axis straight on the tube
Not tied over the top of the staple
Neat wrapping
Good proportions
Below, I will explain these criteria and give some tips to look out for during the blank tying process.
“Seals to the Top”

You can test whether your blank is sealing both visually and by feel. Tight sides (the edges, where the two blades of cane meet and form a seam) are very important to a reed’s functionality.
If starting with gouged cane, watch and feel how the cane folds. Some cane has a crispy feel as it folds, and the hinge creates a nice sharp angle. When completely folded, the cane forms a nice, tight seam. Other cane can feel resistant to fold, creating more of a loop instead of a sharp angle. This kind of cane will need extra pinching and pressure to encourage the tight seam.


Next, your blank should close on both sides as you begin wrapping with thread. Even with the first few wraps, the cane should be pressing tightly together from the tip all the way to the top of the thread. If there is a gap between the blades right above the top wrap of thread, consider tying your blank a millimeter shorter, pushing the cane further down on the staple.

Once you have scraped enough to clip the blank open, you can test the suction by feel. Plug the bottom of the staple with a finger and suck the air out of the reed the way you would suck through a straw. If you are able to create a vacuum, your blank is sealing! If it feels like there is a small amount of air being sucked through a tiny hole, your blank is leaking somewhere.
If the leak is right above the thread, you may be able to seal the leak by applying beeswax, fish skin, or parafilm. If the leak is higher up, it may be a result of uneven shaping. Leaks up higher on a blank will cause response issues when trying to finish the reed.
Some people are able to perform a suction test to feel if a blank is sealing before they even finish tying their blanks. I have never been able to do this, but if you have had success with this, please explain your process in the comments! ;)
“Correct Overlap”
The way in which the two blades of cane overlap one another can affect how tightly the sides of the reed close. Ultimately, we want to see the back blade peeking out from behind the left side of the front blade.

Because the thread is wrapped around the reed in a counter-clockwise direction, each blade is being slightly pulled to its left. By nestling the left edge of the front blade into the back blade, we lock the blades in place and prevent the thread tension from causing the cane to slip out of place.

Setting the overlap involves finding the horizontal axis of the staple. It’s easier to find this axis on staples with a flatter and more oval-shaped opening than on staples with round openings.
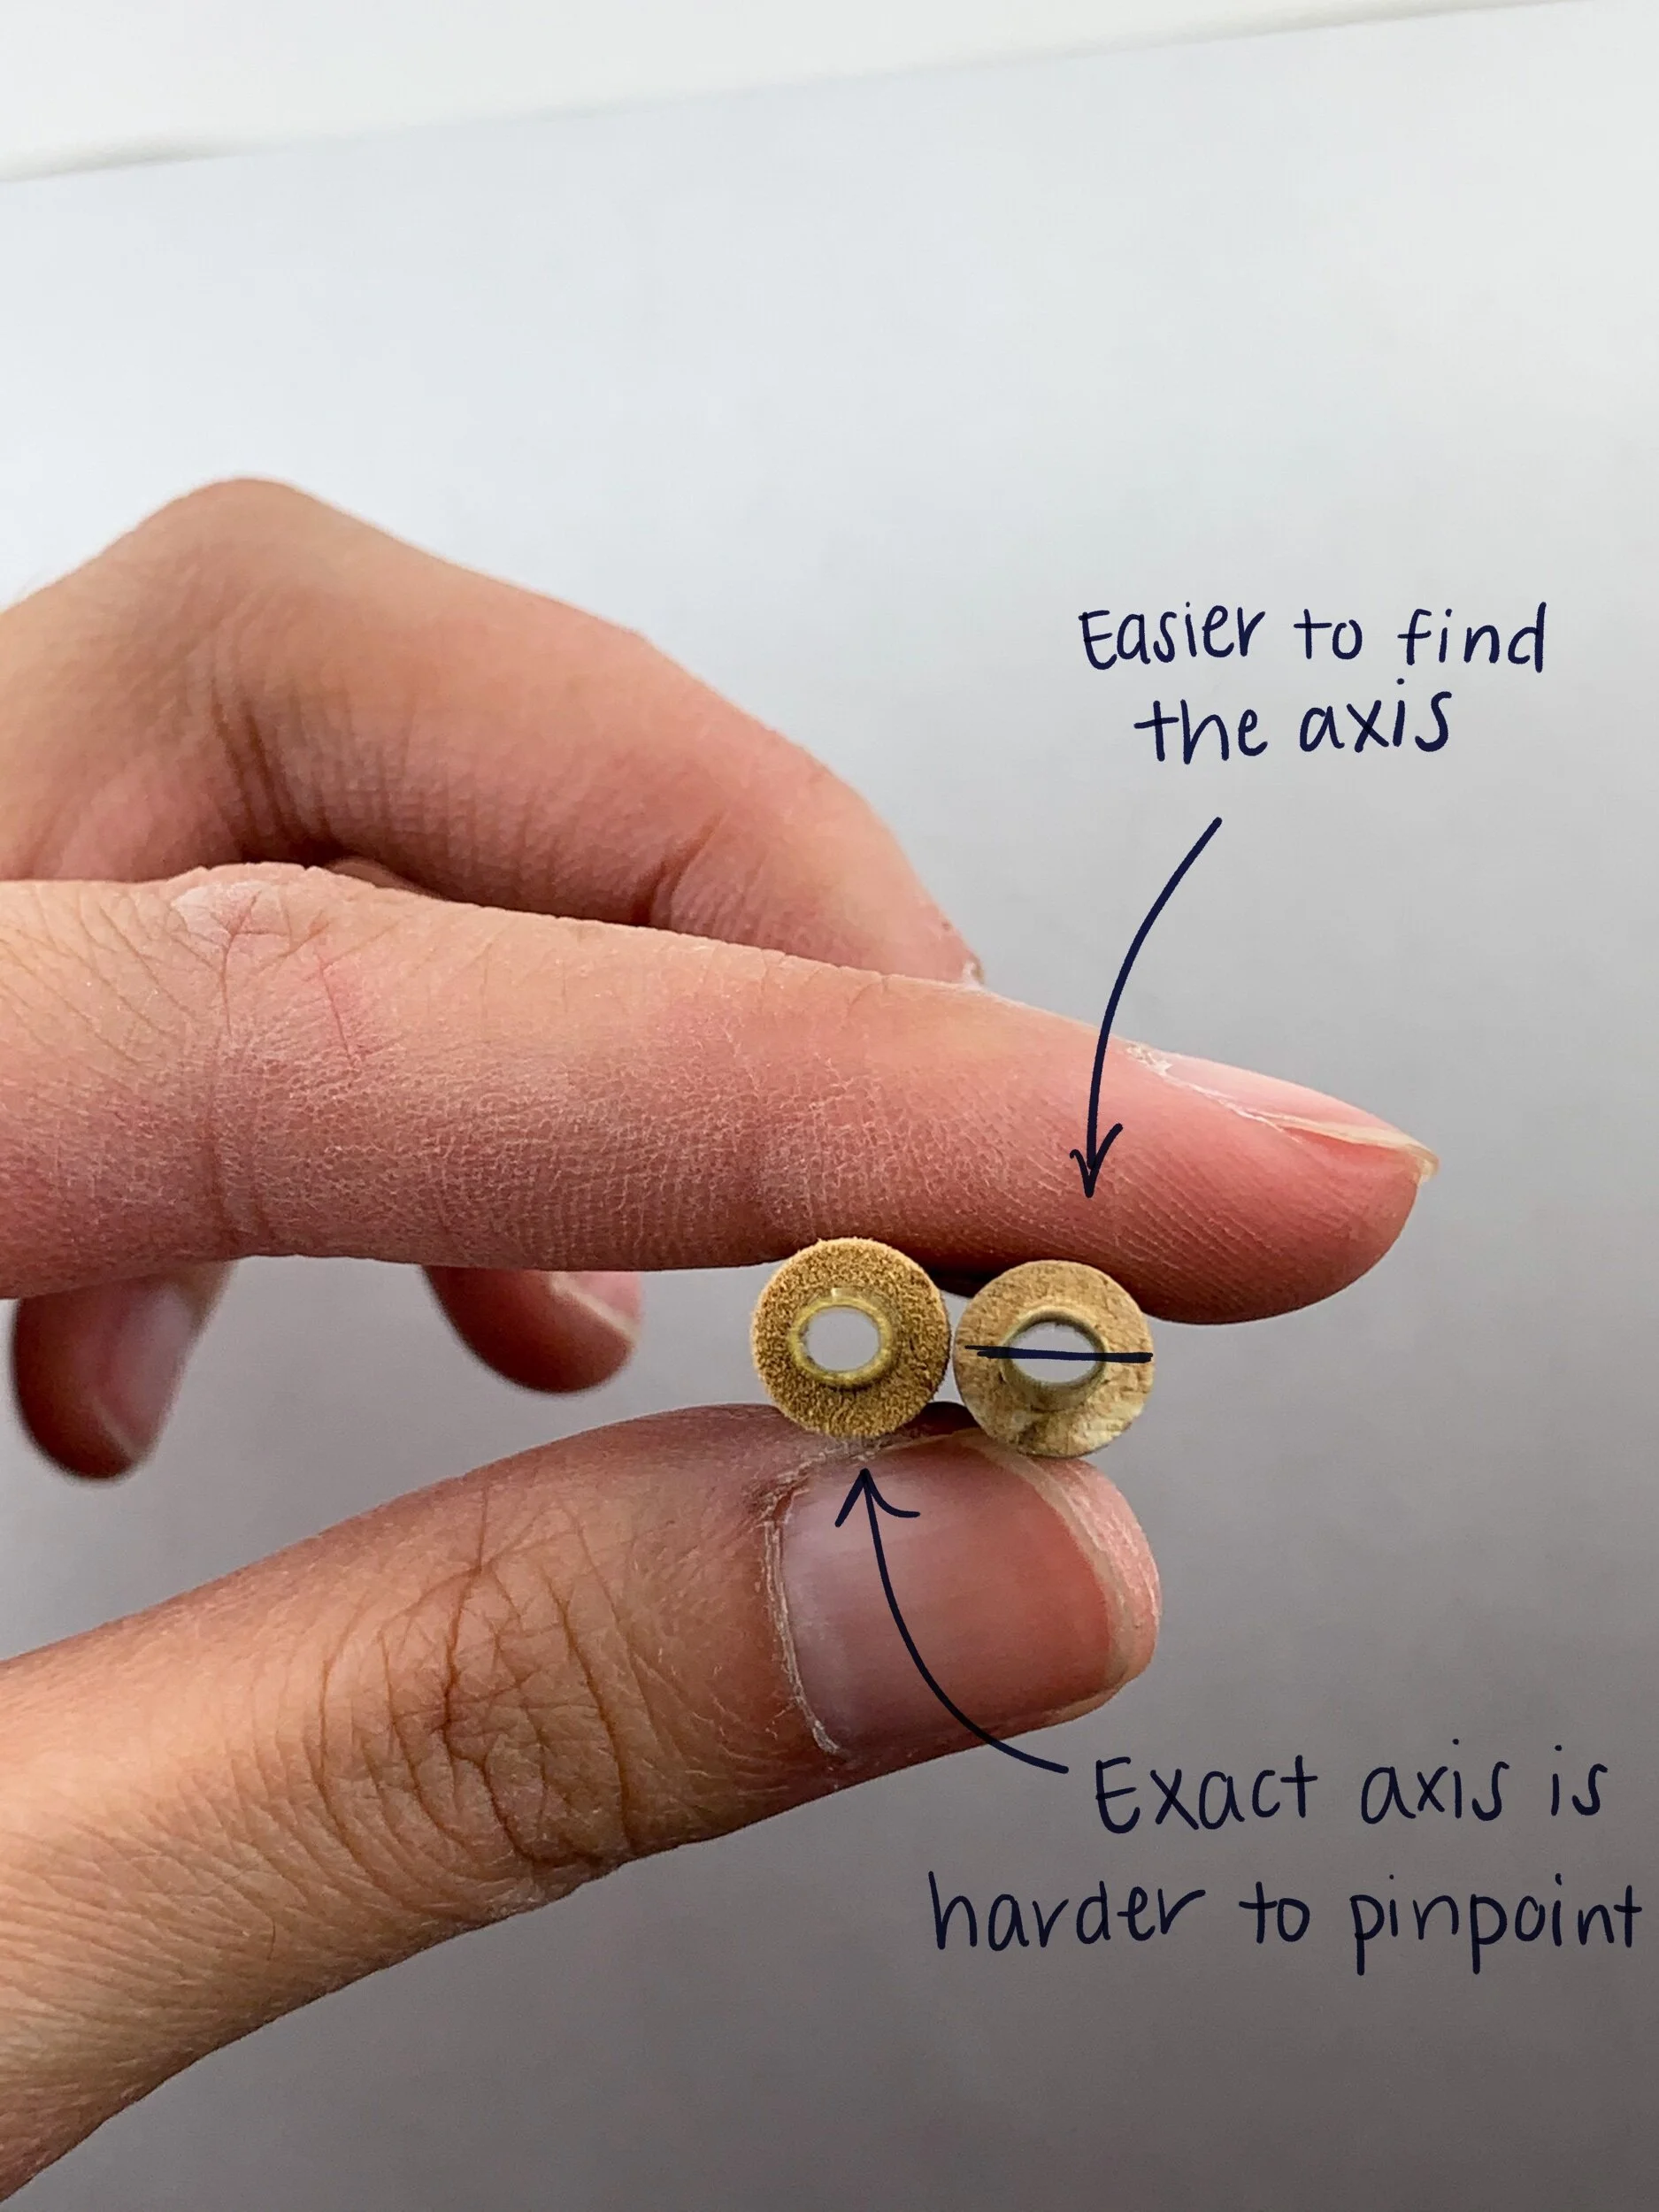
First, set the cane on the staple. Line up the flat of the fold with the horizontal axis of the staple. Oftentimes the axis of the staple will line up with the flat front of the mandrel. Next, rotate the cane very slightly to the right, or rotate the staple and mandrel slightly to the left.

The amount of rotation can be checked by looking through the bottom of the staple and comparing the fold of the cane to the axis of the staple’s opening.
After a few wraps of thread, you can take the staple off of the mandrel and look down the opening of the staple. Here you can double check how much your cane is rotated on the staple. In the illustrations below, the blue line represents the axis of the staple, and the magenta line represents the fold of the cane.


One way that reed makers describe the amount of rotation is by comparing it to a clock face. This rotation can be described as “14 of and 16 after”, with the ends of the fold hitting 14 minutes before 12:00 and 16 minutes after. The cane should only be rotate one “minute” from being parallel with the staple - it’s very subtle!

After scraping and clipping open the blank, you can gently slide the blades of cane so that they overlap on the left side. Sometimes this is accompanied by a satisfying clicking sound! After the overlap has set, the opening of the reed should no longer be rotated when looking down the bottom of the staple. With the blades now slipped into place, the opening should be flat along the axis of the staple.
Achieving the perfect amount of overlap is tricky and takes a lot of practice. When starting out, the most important thing is for the overlap to be on the left side. With time, setting the cane on the staple with the right amount of rotation will become easier.
“Not Tied Over the Top”
Wrapping the thread too far up the reed can choke out and dampen the vibrations. The top of the thread should line up with the top of the staple.
Before tying a blank, measure the length of the staple. Most staples are 47 mm long, but 46 mm staples are also common. Once you start wrapping with thread, make sure to never tie above this number!
It’s better for you thread to stop slightly under 47 mm than slightly over 47 mm. The tricky part is making sure that the cane is closing together equally and tightly on both sides of the blank while still keeping the thread below 47 mm.

“Neat Wrapping”
While the most important part of a reed is its functionality, nice presentation is also an indication of your level of control in reed making. The most important thing to watch for is that there are no gaps near the top of the thread from which air could leak.

“Good Proportions”

Keeping the sections of the reed in proportion will help it feel balanced. Have these proportions in mind even during the first scrapes of a new blank.
Before letting my blanks dry, I like scraping them to a point where I can clip them and set the overlap, and then scraped to a point where they make a peep when I play on them. By the time I’ve finished scraping a blank, I should have the general outlines of the tip, plateau, and back.
This picture outlines the measurements I shoot for. I tie around 72-73 mm long and make sure that my thread stops at 47 mm. I start the bottom of my tip about 5 mm from the top of the reed. My long scrapes start about 3 mm above the top of the thread and go about halfway up the blank.
My first scrapes on a newly tied blank create a W shape at the top of the reed. This is the beginning of forming my tip and establishing where I want my V shape in my finished reed. The bottom of my W hits approximately where I want the bottom of my tip. I usually aim for 67 mm, or about 5 mm back from the tip.

Next, I begin to establish my plateau by removing all of the bark and the white, pithy layer from the entire top half of the blank.

Getting ready to clip my blanks open, I begin to establish my upside-down V shape. I start of define the lower corners and taper the tip off the corners of the end of the reed. Once the end of the tip is thin enough, I clip open my reed and slide the overlap into place.

After clipping the reed open, I insert my plaque and then define the V and taper off the tip even more. Once my reed is thin enough to make a peep, I do a few long strokes to establish where my back will be. I start these scrapes about 3-4 mm from the top of the thread, and let my scrapes blend up into the plateau.

Different reed makers have different processes and scraping orders they follow to remove the bark and establish the different sections of the reed. The most important part is that you envision where you want your tip, plateau, and back to be on your finished reed, and stick to these proportions.
Using the Checklist
Each criterium on this checklist is tricky to master at first. If you are struggling with your blanks, just focus on one point at a time! Setting the overlap correctly and getting the sides to close are both tricky to master, and both happen at the very beginning of the tying process. Take your time while tying blanks to set the cane perfectly on the staple! Your reeds will thank you later on.